Converting MS T/SQL to MySQL

Notes Made During Conversion of MS SQL Stored Procedures to MySQL Stored Procedures

Great online conversion tool can be found here:
http://www.sqlines.com/online

Below are selected statements in MySQL notation:

Convert

convert(int,DATEPART ( HH , NOW() ))

extract (unit from date)

convert(now(), time )

CONVERT(v_CondParam1, UNSIGNED INTEGER)

CAST(v_Value AS UNSIGNED INTEGER);

Exec Stored Procedure

call PostEvent (v_Value, ‘SATEL_CMD’);

Char Index

MySQL doesn’t have a built-in CHARINDEX() function. LOCATE() would be the MySQL equivalent.

Using SUBSTRING_INDEX() might be a more succinct way of doing this. Something like this (disclaimer: untested):

SUBSTRING_INDEX(POS, ‘,’, 1) for POS

SUBSTRING_INDEX(POS, ‘,’, -1) for POS2

select locate(‘r’,’qwerty’)

returns 4

!!! replace CHARINDEX with LOCATE


Date Format

DATE_FORMAT (EXEC_TIME_TO, ‘%H:%i:%s’)

update HS_DATA set VALUE = ‘yy’ , TIMESTAMP = NOW()
where ‘aa’ = ‘ALARM’ and NAME = ‘xx’;

select row_count();

Date Diff

if (TIMESTAMPDIFF(second,now(),v_TEMP_STATE_EXP) > 0)

WHILE

WHILE (v_i < 9)
DO
….

END WHILE;

Cursor

DECLARE HSScheduler_Cursor CURSOR FOR
SELECT ID,
EXEC_DAY_MO,
EXEC_DAY_TU,
EXEC_DAY_WE
FROM HS_SCHEDULER
WHERE STATUS = ‘true’;

OPEN HSScheduler_Cursor;

scheduler_cursor: LOOP

FETCH HSScheduler_Cursor INTO
v_Id,
v_Mo,
v_Tu,
v_We,
v_Th,
v_Fr,

END LOOP scheduler_cursor;

CLOSE HSScheduler_Cursor;


DECLARE v_rowCount int;
DECLARE v_loopCount int;

DECLARE CONTINUE HANDLER FOR NOT FOUND
BEGIN
SET @handler_invoked = 1;
END;

OPEN stsCursor;

set v_rowcount = found_rows();
set v_loopCount = 1;

— select v_rowCount;

main_loop: LOOP

— select v_loopCount , v_rowCount;

IF (v_loopCount > v_rowCount) THEN
LEAVE main_loop;
END IF;

FETCH stsCursor INTO v_WORKFLOW_ID……..

set v_loopCount = v_loopCount + 1;

END LOOP main_loop;
CLOSE stsCursor;

SAML Subject Confirmation Methods

SAML specify the following three methods:

  • Bearer scenario
  • Holder-of-key Scenario
  • Vouches’ Sender Scenario

Bearer scenario

In the bearer scenario, the server automatically trusts the SAML token (after verifying its signature). Thus, in the bearer scenario any client that presents the token can make use of the claims contained in the token (roles, permissions, and so on). It follows that the client must be very careful not to expose the SAML token or to pass it to any untrusted applications. For example, the client/server connection must use encryption, to protect the SAML token from snooping.

Figure below shows a general outline of a typical bearer scenario.

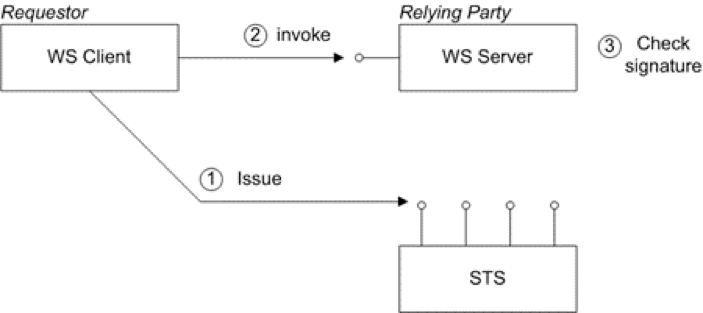
The bearer scenario proceeds as follows:

1. Before invoking an operation on the server, the client sends a RequestSecurityToken (RST) message to the Issue binding of the STS. The RST specifies a KeyType of Bearer.

2. The STS generates a SAML token with subject confirmation type bearer, signs the token using its private key, and then returns the token in a RequestSecurityTokenReply (RSTR) message.

3. The client attempts to invoke an operation on the server, with the SAML token embedded in the SOAP header of the request message, where either the SOAP header or the transport connection must be encrypted, to protect the token.

4. The server checks the signature of the SAML token (using a local copy of the STS public key), to ensure that it has not been tampered with.

Holder-of-key Scenario

The holder-of-key scenario is a refinement of the bearer scenario where, instead of accepting the SAML token when presented by any client, the server attempts to authenticate the client and checks that the client identity matches the holder-of-key identity embedded in the SAML token.

There are two variations on the Holder-of-Key scenario, depending on the value of the KeyType specified in the RST, as follows:

  • PublicKey—the client must prove to the WS server that it possesses a particular private key.
  • SymmetricKey—the client must prove to the WS server that it possesses a particular symmetric session key.

The following figure shows a general outline of a typical holder-of-key scenario:

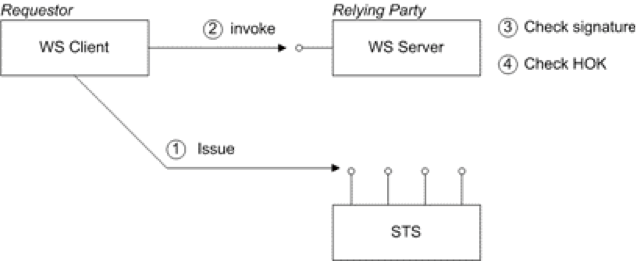
The holder-of- key scenario proceeds as follows:

1. Before invoking an operation on the server, the client sends a RequestSecurityToken (RST) message to the Issue binding of the STS. The STS generates a SAML token with subject confirmation type holder-of-key, embeds the client identity in the token (the holder-of-key identity), signs the token using its private key, and then returns the token in a RequestSecurityTokenReply (RSTR) message.

2. The client attempts to invoke an operation on the server, with the SAML token embedded in the SOAP header of the request message.

3. The server checks the signature of the SAML token (using a local copy of the STS public key), to ensure that it has not been tampered with.

4. The server attempts to authenticate the client (for example, by requiring a client X.509 certificate or by checking WS-Security UsernameToken credentials) and checks that the client’s identity matches the holder-of-key identity.

Implementation of this scenario has the following requirements:

  • SAML tokens with a Holder-Of-Key subject confirmation method must be protected, so the token cannot be snooped. In most cases, a Holder-Of-Key token combined with HTTPS is sufficient to prevent “a man in the middle” getting possession of the token. This means a security policy that uses a sp:TransportBinding and sp:HttpsToken.
  • A Holder-Of-Key token has no encryption or signing keys associated with it, therefore a sp:IssuedToken of SymmetricKey or PublicKey keyType should be used with a sp:SignedEndorsingSupportingTokens.


WSDL example


Message exchange example:

Outbound message to STS

To obtain a SAML security token issued by the security token service, the client sends the following RequestSecurityToken (RST) message to the security token service:


Inbound message from STS


The security token service sends back the following RequestSecurityTokenResponse (RSTR) message, containing a signed SAML token, saml2:Assertion, back to the client:


http://docs.oasis-open.org/wss/oasis-wss-saml-token-profile-1.1#SAMLV2.0

http://www.sopera.de/SAML2

ac:classes:X509

Gpzf8TjPATPsQDAm2ojNdEpht1A=

jsbIP1Z25q4Qedn6OSid4QcV4cs6+lgwB+jDiImwMMEoyzp1BjWQWB+1SIbHfa9rtmmTszLdmeTqxSXiAy2CeVZcIDk1UAfySAhDrrmR5N6lJMJqsQgU4o1ysLsZMKwtR2FL+eya7hJ9e4UtQVH1KOa7Cx1rvl4Dr8u8FuN5Myg=

1.2.840.113549.1.9.1=#160b737473407374732e636f6d,CN=www.sts.com,OU=IT Department,O=Sample STS — NOT FOR PRODUCTION,L=Baltimore,ST=Maryland,C=US

MIID5jCCA0+gAwIBAgIJAPahVdM2UPibMA0GCSqGSIb3DQEBBQUAMIGpMQswCQYDVQQGEwJVUzERMA8GA1UECBMITWFyeWxhbmQxEjAQBgNVBAcTCUJhbHRpbW9yZTEpMCcGA1UEChMgU2FtcGxlIFNU UyAtLSBOT1QgRk9SIFBST0RVQ1RJT04xFjAUBgNVBAsTDUlUIERlcGFydG1lbnQxFDASBgNVBAMT C3d3dy5zdHMuY29tMRowGAYJKoZIhvcNAQkBFgtzdHNAc3RzLmNvbTAeFw0xMTAyMDkxODM4MTNa
Fw0yMTAyMDYxODM4MTNaMIGpMQswCQYDVQQGEwJVUzERMA8GA1UECBMITWFyeWxhbmQxEjAQBgNV BAcTCUJhbHRpbW9yZTEpMCcGA1UEChMgU2FtcGxlIFNUUyAtLSBOT1QgRk9SIFBST0RVQ1RJT04x FjAUBgNVBAsTDUlUIERlcGFydG1lbnQxFDASBgNVBAMTC3d3dy5zdHMuY29tMRowGAYJKoZIhvcN AQkBFgtzdHNAc3RzLmNvbTCBnzANBgkqhkiG9w0BAQEFAAOBjQAwgYkCgYEAo+f8gs4WcteLdSPW
Pm8+ciyEz7zVmA7kcCGFQQvlO0smxRViWJ1x+yniT5Uu86UrAQjxRJyANBomQrirfE7KPrnCm6iV OsGDEntuIZAf7DFPnrv5p++jAZQuR3vm4ZHXFOFTXmI+/FD5AqLfNi17xiTxZCDYyDdD39CNFTrB 2PkCAwEAAaOCARIwggEOMB0GA1UdDgQWBBRa0A38holQIbJMFW7m5ZSw+iVDHDCB3gYDVR0jBIHW MIHTgBRa0A38holQIbJMFW7m5ZSw+iVDHKGBr6SBrDCBqTELMAkGA1UEBhMCVVMxETAPBgNVBAgT
CE1hcnlsYW5kMRIwEAYDVQQHEwlCYWx0aW1vcmUxKTAnBgNVBAoTIFNhbXBsZSBTVFMgLS0gTk9U IEZPUiBQUk9EVUNUSU9OMRYwFAYDVQQLEw1JVCBEZXBhcnRtZW50MRQwEgYDVQQDEwt3d3cuc3Rz LmNvbTEaMBgGCSqGSIb3DQEJARYLc3RzQHN0cy5jb22CCQD2oVXTNlD4mzAMBgNVHRMEBTADAQH/ MA0GCSqGSIb3DQEBBQUAA4GBACp9yK1I9r++pyFT0yrcaV1m1Sub6urJH+GxQLBaTnTsaPLuzq2g
IsJHpwk5XggB+IDe69iKKeb74Vt8aOe5usIWVASgi9ckqCwdfTqYu6KG9BlezqHZdExnIG2v/cD/ 3NkKr7O/a7DjlbE6FZ4G1nrOfVJkjmeAa6txtYm1Dm/f

_181835fb981efecaf71d80ecd5fc3c74

_181835fb981efecaf71d80ecd5fc3c74


Outbound message to the server


The client now embeds the signed SAML token, saml2:Assertion, in the WS-Security header, wsse:Security, when it invokes the greetMeoperation on the server:

http://www.sopera.de/SAML2

ac:classes:X509

Gpzf8TjPATPsQDAm2ojNdEpht1A=

jsbIP1Z25q4Qedn6OSid4QcV4cs6+lgwB+jDiImwMMEoyzp1BjWQWB+1SIbHfa9rtmmTszLdmeTqxSXiAy2CeVZcIDk1UAfySAhDrrmR5N6lJMJqsQgU4o1ysLsZMKwtR2FL+eya7hJ9e4UtQVH1KOa7Cx1rvl4Dr8u8FuN5Myg=

1.2.840.113549.1.9.1=#160b737473407374732e636f6d,CN=www.sts.com,OU=IT Department,O=Sample STS — NOT FOR PRODUCTION,L=Baltimore,ST=Maryland,C=US
MIID5jCCA0+gAwIBAgIJAPahVdM2UPibMA0GCSqGSIb3DQEBBQUAMIGpMQswCQYDVQQGEwJVUzERMA8GA1UECBMITWFyeWxhbmQxEjAQBgNVBAcTCUJhbHRpbW9yZTEpMCcGA1UEChMgU2FtcGxlIFNU UyAtLSBOT1QgRk9SIFBST0RVQ1RJT04xFjAUBgNVBAsTDUlUIERlcGFydG1lbnQxFDASBgNVBAMT C3d3dy5zdHMuY29tMRowGAYJKoZIhvcNAQkBFgtzdHNAc3RzLmNvbTAeFw0xMTAyMDkxODM4MTNa
Fw0yMTAyMDYxODM4MTNaMIGpMQswCQYDVQQGEwJVUzERMA8GA1UECBMITWFyeWxhbmQxEjAQBgNV BAcTCUJhbHRpbW9yZTEpMCcGA1UEChMgU2FtcGxlIFNUUyAtLSBOT1QgRk9SIFBST0RVQ1RJT04x FjAUBgNVBAsTDUlUIERlcGFydG1lbnQxFDASBgNVBAMTC3d3dy5zdHMuY29tMRowGAYJKoZIhvcN AQkBFgtzdHNAc3RzLmNvbTCBnzANBgkqhkiG9w0BAQEFAAOBjQAwgYkCgYEAo+f8gs4WcteLdSPW
Pm8+ciyEz7zVmA7kcCGFQQvlO0smxRViWJ1x+yniT5Uu86UrAQjxRJyANBomQrirfE7KPrnCm6iV OsGDEntuIZAf7DFPnrv5p++jAZQuR3vm4ZHXFOFTXmI+/FD5AqLfNi17xiTxZCDYyDdD39CNFTrB 2PkCAwEAAaOCARIwggEOMB0GA1UdDgQWBBRa0A38holQIbJMFW7m5ZSw+iVDHDCB3gYDVR0jBIHW MIHTgBRa0A38holQIbJMFW7m5ZSw+iVDHKGBr6SBrDCBqTELMAkGA1UEBhMCVVMxETAPBgNVBAgT
CE1hcnlsYW5kMRIwEAYDVQQHEwlCYWx0aW1vcmUxKTAnBgNVBAoTIFNhbXBsZSBTVFMgLS0gTk9U IEZPUiBQUk9EVUNUSU9OMRYwFAYDVQQLEw1JVCBEZXBhcnRtZW50MRQwEgYDVQQDEwt3d3cuc3Rz LmNvbTEaMBgGCSqGSIb3DQEJARYLc3RzQHN0cy5jb22CCQD2oVXTNlD4mzAMBgNVHRMEBTADAQH/ MA0GCSqGSIb3DQEBBQUAA4GBACp9yK1I9r++pyFT0yrcaV1m1Sub6urJH+GxQLBaTnTsaPLuzq2g
IsJHpwk5XggB+IDe69iKKeb74Vt8aOe5usIWVASgi9ckqCwdfTqYu6KG9BlezqHZdExnIG2v/cD/ 3NkKr7O/a7DjlbE6FZ4G1nrOfVJkjmeAa6txtYm1Dm/f

TEST


Inbound message from the server


When the server receives the preceding SOAP request, the soap:mustUnderstand=”1″ attribute setting ensures that the server must process the security header. In addition, the presence of a signature in the SAML token means that the server must confirm the signature.After successfully processing the security header, the server sends back the following reply to the client:

Hello TEST


Vouches’ Sender Scenario

You can use the sender-vouches confirmation method for SSO scenarios where the WS intermediary system has a trust relationship with the back-end system.

This scenario defines four different entities:

(1) a client,

(2) an intermediary,

(3) SAML issuer,

and (4) a back-end system that is the WS provider.

For an overview of the system interaction for this scenario, see the figure below:


The following steps describe in more detail the lifetime of a request using the SAML sender-vouches profile.

1. The client sends a request to the intermediary. This request can be of any kind but must contain valid authentication information to log the client on to the intermediary.

2. The intermediary authenticates the client. To process the request, the intermediary needs to retrieve information from the back-end system using Web Services forwarding mechanisms for the client’s authentication information.

3. To forward the client’s authentication, the intermediary needs to add a SAML assertion to the request. This assertion is provided by the issuer. To get it the intermediary needs to forward all necessary login information to the issuer, which in return creates the SAML assertion.

4. The assertion is added to the Web service request. To vouch for the integrity of the SAML assertion and the payload of the Web service request both are signed by the intermediary using a digital signature. The intermediary is able to vouch for the SAML assertion because there is an explicit trust relationship between the back-end system and the intermediary, which enables the back-end system to verify the digital signature.

5. The Web service request containing the SAML assertion is now sent to the back-end system.

6. The back-end system attempts to verify the SAML assertion. Other than checking the correctness of the SAML assertion, the back-end system also verifies that the issuer is trusted and there is an existing trust relationship between the intermediary and the back-end system. After successful verification, the client is logged on to the system and the request is processed.

7. The back-end system sends a response to the intermediary. The intermediary uses the received data to complete the client’s request and send a response to the client.

SAML 2.0 Assertion example:

https://technet.microsoft.com/en-us/library/dn133771.aspx?f=255&MSPPError=-2147217396

References:

1. https://access.redhat.com/documentation/en-US/Red_Hat_JBoss_Fuse/6.0/html/Web_Services_Security_Guide/files/WsTrust-BasicScenario.html
2. https://www.oasis-open.org/committees/download.php/16768/wss-v1.1-spec-os-SAMLTokenProfile.pdf 3. http://dulanja.blogspot.com/2013/01/saml-subject-confirmation-methods.html
4. http://fusionsecurity.blogspot.com/2009/09/bearer-confirmation-method-huh-what-is.html
5. http://docs.oasis-open.org/security/saml/Post2.0/sstc-saml2-holder-of-key.pdf
6. https://docs.jboss.org/author/display/JBWS/SAML+Holder-Of-Key+Assertion+Scenario?_sscc=t
7. https://help.sap.com/saphelp_nwpi71/helpdata/en/44/322225a52d5447e10000000a422035/content.htm
8. https://access.redhat.com/documentation/en-US/Fuse_ESB/4.4.1/html/Web_Services_Security_Guide/files/WsTrust-Demo-Messages.html

Problems with Mono on Raspbian Jessie

After migrating to Jessie, I had several problems running C# applications on MONO. Those applications are running correctly on the previous versions of Raspbian/Debian.

As Jessie comes with biuld-in MONO, the solution is to manually downgrade version of MONO. Post [1] (cites below) was very helpful.

Edit your /etc/apt/sources.list.d/mono-xamarin.list and change:

deb http://download.mono-project.com/repo/debian wheezy main

to:

deb http://download.mono-project.com/repo/debian wheezy/snapshots/4.0.5.1 main

That will pin it to version 4.0.5.1.

FYI: Make sure that you do not have any alpha/beta repos for mono in any of your /etc/apt/sources/list.d/xxxxx.list files.

Basic Steps to Downgrade:

sudo apt-get remove mono-complete
# Edit your mono-xamarin.list and pin it to the version of your choice.
sudo apt-get update
sudo apt-get install mono-complete

Accessing older releases If for some reason you want to pin an older version of Mono rather than updating to the latest, you can modify the Debian repository to “wheezy/snapshots/X.XX.X” instead of “wheezy”. For example, “wheezy/snapshots/3.10.0” will lock you to that version.

These snapshots will cease receiving updates as soon as the next major Mono version gets uploaded – for example, as soon as Mono 3.12 gets uploaded, 3.10 will never receive updates.

Ref: Versions available:

http://download.mono-project.com/repo/debian/pool/main/m/mono/

Problem with SerialPort.DataReceived

There is a great work around described at:

http://antanas.veiverys.com/mono-serialport-datareceived-event-workaround-using-a-derived-class/

Rerefences

[1] http://stackoverflow.com/questions/33763177/install-older-version-of-mono

Other links

http://stackoverflow.com/questions/29982959/how-to-install-mono-4-0-1-on-debian-8
https://packages.debian.org/jessie/mono-complete
http://stackoverflow.com/questions/37779772/mono-system-typeloadexception-could-not-load-types
http://stackoverflow.com/questions/7598088/purpose-of-activator-createinstance-with-example
http://stackoverflow.com/questions/29328975/unhandled-exception-system-reflection-reflectiontypeloadexception-in-unity3d
http://forum.kerbalspaceprogram.com/index.php?/topic/121763-am-i-the-wrong-one-or-am-i-really-having-performance-issues/
http://blog.bennymichielsen.be/2016/03/14/getting-up-and-running-with-mono-and-raspberry-pi-3/
http://serverfault.com/questions/357323/how-can-i-list-my-open-ports-on-debian
http://www.mono-project.com/docs/about-mono/compatibility/
http://answers.unity3d.com/questions/1106476/cannot-load-classes-from-the-module-solved.html
http://www.mono-project.com/docs/getting-started/install/linux/
http://stackoverflow.com/questions/13589364/mono-3-0-0-could-not-load-file-or-assembly-system-web-extensions-dll-version

Xcode: No signing certificate “iOS Distribution” found

[http://stackoverflow.com/questions/32821189/xcode-7-error-missing-ios-distribution-signing-identity-for]

  • Download https://developer.apple.com/certificationauthority/AppleWWDRCA.cer
  • Double-click to install to Keychain.
  • Then in Keychain, Select View -> “Show Expired Certificates” in Keychain app.
  • It will list all the expired certifcates.
  • Delete “Apple Worldwide Developer Relations Certificate Authority certificates” from “login” tab
  • And also delete it from “System” tab.

Universal App with Visual Studio tools for Apache Cordova – iOS Distribution

Practical steps to create universal app with VS2015. Based on the oryginal post by Authored by Norm Estabrook with contributions from Raghav Katyal, Mikejo5001, rido-min,Linda Z with comments.

Package the iOS version of your app

Prerequisites

Install node.js

Checklist before publication

1. Make sure version number has been updated

It can’t be changed later on, during the process

2. Configure for Archive (iOS)

Before creating an archive make sure that development team is selected in general section of project’s configuration.

  • Request a distribution certificate.
  • Create a distribution provisioning profile.
  • Download the distribution provisioning profile in Xcode.
  • Modify the settings of your app.
  • Create the package.


Simplified steps (iOS)

Prepare app to run on iPhone X
https://blog.phonegap.com/displaying-a-phonegap-app-correctly-on-the-iphone-x-c4a85664c493

Step 0: Run remote tools on Mac:

remotebuild –secure false

Stap 1: Run remote iOS build in Visual Studio

Step 2: Copy project from: /Users/leszekj/.taco_home/remote-builds/taco-remote/builds to your prefered directory on Mac

Step 3: Open project in Xcode from …/cordovaApp/platforms/ios

Step 4: Check icons and images in Xcode distribution. Icons are located in: \cordovaApp\platforms\ios\<App_name>\Images.xcassets\AppIcon.appiconset\
Make sure, that the icon set is correct.

Step 5: Update warnings to recommended settings

Step 6: Select a development team

Step 7: Update <app-name>-info.plist file > add

NSAppTransportSecurity

NSAllowsArbitraryLoads

NSExceptionDomains

your_json_source

to allow access to remote JSON sources

In case of problems with TSL

  • <key>NSAppTransportSecurity</key>  
  • <dict>  
  •     <key>NSExceptionDomains</key>  
  •     <dict>  
  •         <key>flightplanning.navcanada.ca</key>  
  •         <dict>  
  •             <key>NSExceptionMinimumTLSVersion</key>  
  •             <string>TLSv1.0</string>  
  •             <key>NSExceptionRequiresForwardSecrecy</key>  
  •             <false/>  
  •         </dict>  
  •     </dict>  
  • </dict>  
  •  

    Step 8: Run application on local device (iPhone or iPad)

    Step 9: Run menu > Product > Analyze

    Step 10: Run menu > Product > Archive

    In case of error, uncheck “Automatically manage signing”, select development profile, and check again “Automatically manage signing”. Then re-run archive

    https://stackoverflow.com/questions/40824727/i-get-conflicting-provisioning-settings-error-when-i-try-to-archive-to-submit-an

    For those coming from Ionic or Cordova, you can try the following:

    Open the file yourproject/platforms/ios/cordova/build-release.xcconfig and change from this:

    CODE_SIGN_IDENTITY = iPhone DistributionCODE_SIGN_IDENTITY[sdk=iphoneos*] = iPhone Distribution

    into this:

    CODE_SIGN_IDENTITY = iPhone DeveloperCODE_SIGN_IDENTITY[sdk=iphoneos*] = iPhone Developer

    and try to run the ios cordova build ios --release again to compile a release build.

    Reference: https://forum.ionicframework.com/t/ios-build-release-error-is-automatically-signed-for-development-but-a-conflicting-code-signing-identity-iphone-distribution-has-been-manually-specified/100633/7

    Step 11: Upload application to iStore from Xcode


    ______________

    Full process:

    Step 1: Request a distribution certificate

    A distribution certificate identifies your team or organization.

    If your team already has one and you want to reuse it, see How to share an iOS distribution certificate. Then, skip straight to the Modify the settings of your app section.

    If you don’t have a distribution certificate yet, continue on with this section and we’ll help you set one up.

    1. Start Xcode.

      If you haven’t installed Xcode, see the First, install a few things onto your Mac section of the iOS setup guide.

    2. In Xcode, add your Apple ID (If you haven’t done so already).

      See Adding an Apple ID to Your Accounts.

    3. In the menu bar, choose Xcode->Preferences.
    4. In the Accounts page, choose the View Details button.
    5. In the account details page, choose the Create button next to the iOS Distribution signing identity.

      Looking for more information about signing identities? See Creating Signing Identities(Optional reading).

    6. Choose the Done button to close the account details page.

    Step 2: Create a distribution provisioning profile

    A distribution provisioning profile lets you submit your app to the store.

    1. On the Member Center page, choose the Certificates, Identifiers & Profiles link.
    2. In the Certificates, Identifiers & Profiles page, choose the Provisioning Profiles link.
    3. In the Provisioning Profiles page, choose the + button.
    4. In the What type of provisioning profile do you need? page, choose the App Store option, and then choose the Continue button.
    5. In the Select App ID page, choose the App ID of your app, and then choose the Continuebutton.
    6. In the Select certificates page, select the distribution certificate that you created earlier in Xcode, and then choose the Continue button.
    7. In the Name this profile and generate page, name your profile, and then choose the Generatebutton.
    8. In the Your provisioning profile is ready page, choose the Download button.

    Need more detail? See Creating provisioning profiles using Member Center

    Step 3: Download the distribution provisioning profile

    1. Open Xcode.
    2. In the menu bar, choose Xcode->Preferences.
    3. In the Accounts page, choose the View Details button.
    4. In the account details page, choose the Download button next to your provisioning profile’s signing identity.
    5. Choose the Done button to close the account details page.

    Step 4: Modify the settings of your app

    The general settings of your app appear in the Common page of the configuration designer.

    • The Display Name is the name that appears in the app store.
    • The Package Name is a string that uniquely identifies your app.

      This identifier has to match the identifier of your distribution provisioning profile.

      You can find the indentier of your profile by choosing your distribution profile in the Provisioning Profiles page of the Apple developer Member Center.

      .

    • The Domain Access collection lists the domains that your app needs to access.

      For example, the WeatherApp that appears in the previous image, obtains weather data from a service endpoint that has the domain https://query.yahooapis.com.

    The purpose of most other settings clear from the title, but you can find more information about them here: The config.xml File.

    iOS-specific settings appear in the iOS tab of the configuration designer.

    You can read about each option in the preference section of the config.xml reference topic.

    Step 5: Create the package

    Build your app to generate the package that you will submit to the store.

    1. On your Mac, make sure that the remote agent is running.

      See Start the remote agent on your mac.

    2. In Visual Studio, open the project for your app.
    3. On the Standard toolbar, choose the iOS platform.
    4. Choose Remote Device.

      .

    5. Choose the Release build configuration.
    6. On the Build menu, choose Build Solution.

      This starts a build on the remotebuild agent and uses the distribution certificate and the matching provisioning profile to build a release signed iOS Application Archive (.ipa) file.

      You can find that file in the bin/iOS/Release folder of your project.

    Submit your app to the store

    1. Copy the .ipa file into a folder on your Mac.
    2. Create an iTunes Connect Record for your app.
    3. Use the Application Loader to upload your .ipa file to iTunes.

    Apple reviews your app. If they don’t accept it, you’ll receive an email that explains the reason and what you can do to fix it. These articles describe common reasons why apps get rejected.

    Common Problems

    iFrame navigation

    If you are using iFrames, links might open in new Safari window.The work around is described in the following post [1].

    First, add the following to confine.xml

    <allow-navigation href=”https://remote.zensystem.pl&#8221; iframe=”true” />

    I was facing this issue for a new application I’m working now, and it seems that is related with new whitelisting mode in Cordova iOS > 6. For us, I have made a workaround for allow navigation inside iframes (I can’t be sure if it could generate any other problem, but for now we haven’t seem anyone). In cordova project, at Private/Plugins/CDVUIWebViewEngine/CDVIntentAndNavigationFilter.m, we’ve just modified the shouldOverrideLoadWithRequest:navigationType: method, changing the behaviour when a navigation is requested via UIWebViewNavigationTypeLinkClicked.

    With the new Cordova behaviour, in that case it stops navigation, and open it in system browser; I’ve commented that line ([[UIApplication sharedApplication] openURL:url]; ) and modified the return, to return YES; and with this two changes it is working as previous versions of cordova.

    TIP: Just search in Xcode for UIWebViewNavigationTypeLinkClicked


    Create iOS icons and splashes for the application


    Create splashes with: http://ticons.fokkezb.nl

    References


    [1] http://stackoverflow.com/questions/36572869/why-are-links-inside-an-iframe-opening-in-system-safari

    Universal App with Visual Studio 2015 tools for Apache Cordova – Windows Distribution

    Practical steps to create universal app with VS2015. Based on the oryginal post by Authored by Norm Estabrook with contributions from Raghav Katyal, Mikejo5001, rido-min,Linda Z with comments.

    Package the Windows version of your app

    First, decide which platforms and device families you want to make your app available to. You can make your app available to Windows Phones, desktop PCs, and tablets.

    It doesn’t matter which version of Windows the app targets. The Windows store accepts all of them. That said, the operating system of a device or PC only runs apps that target the same version of that operating system or an earlier version.

    To learn more about Windows package and Windows device compatibility, see OS versions and package distribution.

    In this section:

    • Modify the settings of your app.
    • Make your app available to Windows Phones.
    • Make your app available to Windows desktop PCs or tablets.
    • Install your app on a device or publish it to the store.

    Modify the setting of your app

    The general settings of your app appear in the Common page of the configuration designer.

    • The Display Name is the name that appears in the app store.
    • The Package Name is a string that uniquely identifies your app.

      Choose a naming scheme that reduces the chance of a name conflict.

    • The Domain Access collection lists the domains that your app needs to access.

      For example, the WeatherApp that appears in the previous image, obtains weather data from a service endpoint that has the domain https://query.yahooapis.com.

    The purpose of most other settings clear from the title, but you can find more information about them here: The config.xml File.

    Windows-specific settings appear in the Windows tab of the configuration designer.

    You might have noticed that the this page shares three of the same field names as the Common page (Display Name, Package Name, and Version).

    In the Create App Package Wizard (which you’ll use later) you might have to choose a different display name or package name because of Windows-specific naming requirements, the name has already been reserved by someone else, or if you want to associate your app with a name that you’ve previously reserved.

    In any of these cases, Visual Studio updates the Display Name and Package Name on the Windowspage once you’ve completed the wizard. That way your other platform targets are not forced to use those names.

    The reason why this page has a Version field is because Windows uses a 4 digit version number instead of a 3 digit one. You can either modify this field directly or let Visual Studio set this field based on the version number that you choose in the Create App Package Wizard.

    We’ll look at the Windows Target Version field in the next section.

    Make your app available to Windows Phones

    Which version of Windows does your app target? Choose a section:

    YOUR APP TARGETS WINDOWS 10

    1. In the Standard Toolbar, choose Windows-ARM.
    2. In the Windows page of the configuration designer, choose Windows 10 from the Windows Target Version dropdown list.

      .

    3. Choose Project->Store->Create App Packages to start the packaging wizard.
    4. Complete the wizard.

      For step-by-step guidance, see Create an app package

    5. Find your packaging files in the AppPackages folder in the root of your project.
    6. Install your Windows app onto a device or publish it to the store.

    YOUR APP TARGETS WINDOWS 8.1

    1. In the Standard Toolbar, choose Windows Phone (Universal).
    2. In the Windows page of the configuration designer, choose Windows 10 from the Windows Target Version dropdown list.

      .

    3. Choose Project->Store->Create App Packages to start the packaging wizard.
    4. Complete the wizard.

      For step-by-step guidance, see Create an app package

    5. Find your packaging files in the AppPackages folder in the root of your project.
    6. Install your Windows app onto a device or publish it to the store.

    YOUR APP TARGETS WINDOWS PHONE 8

    1. In the Standard Toolbar, choose the Release configuration.
    2. Choose Windows Phone 8.
    3. Choose Build->Build Solution to build your package.
    4. Find your packaging files in the bin\WindowsPhone8\Release folder in the root of your project.
    5. Install your Windows app onto a device or publish it to the store.

    Make your app available to Windows desktop PCs or tablets

    1. In the Standard Toolbar, choose Windows-AnyCPU.
    2. In the Windows page of the configuration designer, choose Windows 10 or Windows 8.1 from the Windows Target Version dropdown list.

      .

    3. Choose Project->Store->Create App Packages to start the packaging wizard.
    4. Complete the wizard and in the wizard choose which platforms you want to make your app available to.

      For step-by-step guidance, see Create an app package

    5. Find your packaging files in the AppPackages folder in the root of your project.

    Install your Windows app onto a device or publish it to the store

    To publish your app to the store, see Publish Windows apps.

    To install your app directly onto a device Sideload your app package.

    Use Bower with Visual Studio

    Pre-requisites

    Install node.js, bower and git.

    Git installation

    • Install git tools (if not already installed) from http://git-scm.com/download/win or from https://git-for-windows.github.io/
    • In the command line enter the following command(or git bash if you did not add git to your PATH):
    • In VS menu Tools > Options.. > Projects and Solutions > External Web Tools
      • Uncheck $(DevEnvDir)\Extensions\Microsoft\Web Tools\External\git
      • Add C:\Program Files (x86)\Git\bin

    Update PATH in Win 10

    Update options in VS

    You can try also:

    npm install --save npm-git-install

    Minimize SD Cad Usage on Raspberry Pi

    Use fDisk

    root@raspberrypi:/home/pi# sudo fdisk -l
    Disk /dev/mmcblk0: 8068 MB, 8068792320 bytes
    4 heads, 16 sectors/track, 246240 cylinders, total 15759360 sectors
    Units = sectors of 1 * 512 = 512 bytes
    Sector size (logical/physical): 512 bytes / 512 bytes
    I/O size (minimum/optimal): 512 bytes / 512 bytes
    Disk identifier: 0x000b5098Device Boot      Start         End      Blocks   Id  System/dev/mmcblk0p1            8192      122879       57344    c  W95 FAT32 (LBA)/dev/mmcblk0p2          122880    14878719     7377920   83  Linux
    root@raspberrypi:/home/pi# tune2fs -c 0 /dev/mmcblk0p2
    tune2fs 1.42.5 (29-Jul-2012)Setting maximal mount count to -1
    root@raspberrypi:/home/pi#


    Manage Linux system logs

    using init-scripts:/etc/init.d/syslogd stop

    We will first solve the usual corruption culprit and then move on to making sure we are covered when our programs decide to blow up.
    The following two lines should be added to /etc/fstab:

          
    /var/run        tmpfs   size=1M,noatime         0 0none        /var/log        tmpfs   size=1M,noatime         0 0


    After this, /etc/fstab should look as follows:

    proc            /proc               proc    defaults                    0   0/dev/mmcblk0p1  /boot               vfat    ro,noatime                  0   2/dev/mmcblk0p2  /                   ext4    defaults,noatime            0   1none            /var/run        tmpfs   size=1M,noatime             0   0none            /var/log        tmpfs   size=1M,noatime             0   0


    Disable swapping

    Run the following commands to disable swapping forever on your system:

    sudo dphys-swapfile swapoff
    sudo dphys-swapfile uninstall
    sudo update-rc.d dphys-swapfile remove
    
    #After doing this, call free -m in order to see your memory usage
    
    pi@raspberrypi ~ $ free -m             
    
    total       used       free     shared    buffers     cachedMem:           438         59        378          0          9         27-/+ buffers/cache:         22        416Swap:            0          0          0


    see your memory usage:

    free -m


    You can tell it to keep no backups by specifying rotate 0 (or a lower number) for the specific log. Look in /etc/logrotate.d to find the specific configuration fragment. It’s been awhile since I’ve looked into logrotate but I think you can specify it to limit the size of files and such.Poszczególne logi zablokowałem # w pliku /etc/rsyslog.conf

    I also changed:

    /etc/logrotate.conf  >> rotate=0
    

    Check Actual Disk IO

    important:report from

    iotop -obtaqqq > output.txt

    14:50:27    37 be/3 root          0.00 B      4.00 K  0.00 %  0.77 % [jbd2/mmcblk0p2-]14:50:27 15706 be/4 root          0.00 B      4.00 K  0.00 %  0.00 % python /usr/sbin/iotop -obtaqqq14:50:29    37 be/3 root          0.00 B      4.00 K  0.00 %  0.71 % [jbd2/mmcblk0p2-]14:50:29 15706 be/4 root          0.00 B      4.00 K  0.00 %  0.00 % python /usr/sbin/iotop -obtaqqq14:50:30    37 be/3 root          0.00 B      4.00 K  0.00 %  0.65 % [jbd2/mmcblk0p2-]14:50:30 15706 be/4 root          0.00 B      4.00 K  0.00 %  0.00 % python /usr/sbin/iotop -obtaqqq14:50:31    37 be/3 root          0.00 B      4.00 K  0.00 %  0.76 % [jbd2/mmcblk0p2-]14:50:31 15706 be/4 root          0.00 B      4.00 K  0.00 %  0.00 % python /usr/sbin/iotop -obtaqqq14:50:33    37 be/3 root          0.00 B      4.00 K  0.00 %  0.71 % [jbd2/mmcblk0p2-]14:50:33 15706 be/4 root          0.00 B      4.00 K  0.00 %  0.00 % python /usr/sbin/iotop -obtaqqq14:50:34    37 be/3 root          0.00 B      4.00 K  0.00 %  0.67 % [jbd2/mmcblk0p2-]14:50:34 15706 be/4 root          0.00 B      4.00 K  0.00 %  0.00 % python /usr/sbin/iotop -obtaqqq14:50:35    37 be/3 root          0.00 B      4.00 K  0.00 %  0.63 % [jbd2/mmcblk0p2-]14:50:35 15706 be/4 root          0.00 B      4.00 K  0.00 %  0.00 % python /usr/sbin/iotop -obtaqqq14:50:37    37 be/3 root          0.00 B      4.00 K  0.00 %  0.59 % [jbd2/mmcblk0p2-]14:50:37 15706 be/4 root          0.00 B      4.00 K  0.00 %  0.00 % python /usr/sbin/iotop -obtaqqq14:50:38    37 be/3 root          0.00 B      4.00 K  0.00 %  0.72 % [jbd2/mmcblk0p2-]14:50:38 15706 be/4 root          0.00 B      4.00 K  0.00 %  0.00 % python /usr/sbin/iotop -obtaqqq14:50:39    37 be/3 root          0.00 B      4.00 K  0.00 %  0.69 % [jbd2/mmcblk0p2-]14:50:39 15706 be/4 root          0.00 B      4.00 K  0.00 %  0.00 % python /usr/sbin/iotop -obtaqqq14:50:41    37 be/3 root          0.00 B      4.00 K  0.00 %  0.66 % [jbd2/mmcblk0p2-]14:50:41 15706 be/4 root          0.00 B      4.00 K  0.00 %  0.00 % python /usr/sbin/iotop -obtaqqq14:50:42    37 be/3 root          0.00 B      4.00 K  0.00 %  0.63 % [jbd2/mmcblk0p2-]14:50:42 15706 be/4 root          0.00 B      4.00 K  0.00 %  0.00 % python /usr/sbin/iotop -obtaqqq14:50:43    37 be/3 root          0.00 B      4.00 K  0.00 %  0.65 % [jbd2/mmcblk0p2-]14:50:43 15706 be/4 root          0.00 B      4.00 K  0.00 %  0.00 % python /usr/sbin/iotop -obtaqqq14:50:45    37 be/3 root          0.00 B      4.00 K  0.00 %  0.62 % [jbd2/mmcblk0p2-]14:50:45 15706 be/4 root          0.00 B      4.00 K  0.00 %  0.00 % python /usr/sbin/iotop -obtaqqq14:50:46    37 be/3 root          0.00 B      4.00 K  0.00 %  0.60 % [jbd2/mmcblk0p2-]14:50:46 15706 be/4 root          0.00 B      8.00 K  0.00 %  0.00 % python /usr/sbin/iotop -obtaqqq14:50:47    37 be/3 root          0.00 B      4.00 K  0.00 %  0.61 % [jbd2/mmcblk0p2-]14:50:47 15706 be/4 root          0.00 B      8.00 K  0.00 %  0.00 % python /usr/sbin/iotop -obtaqqq14:50:49    37 be/3 root          0.00 B     40.00 K  0.00 %  0.60 % [jbd2/mmcblk0p2-]14:50:49 15706 be/4 root          0.00 B      8.00 K  0.00 %  0.00 % python /usr/sbin/iotop -obtaqqq14:50:50    37 be/3 root          0.00 B     40.00 K  0.00 %  0.58 % [jbd2/mmcblk0p2-]14:50:50 15706 be/4 root          0.00 B     12.00 K  0.00 %  0.00 % python /usr/sbin/iotop -obtaqqq14:50:51    37 be/3 root          0.00 B     40.00 K  0.00 %  0.56 % [jbd2/mmcblk0p2-]14:50:51 15706 be/4 root          0.00 B     12.00 K  0.00 %  0.00 % python /usr/sbin/iotop -obtaqqq14:50:52    37 be/3 root          0.00 B     40.00 K  0.00 %  0.54 % [jbd2/mmcblk0p2-]14:50:52 15706 be/4 root          0.00 B     12.00 K  0.00 %  0.00 % python /usr/sbin/iotop -obtaqqq14:50:54    37 be/3 root          0.00 B     40.00 K  0.00 %  0.65 % [jbd2/mmcblk0p2-]14:50:54 15706 be/4 root          0.00 B     16.00 K  0.00 %  0.01 % python /usr/sbin/iotop -obtaqqq
    

    jbd2

    jbd2 is causing disk utilization

    [https://bbs.archlinux.org/viewtopic.php?id=113516&p=2]

    Add commit to /etc/fstab like this:/dev/sda1 / ext4 defaults,noatime,commit=60 0 1

    Add commit to /etc/fstab like this:

    /dev/sda1 / ext4 defaults,noatime,commit=60    0   1


    or

    cp /usr/lib/pm-utils/power.d/journal-commit /etc/pm/power.d/journal-commit


    and then edit /etc/pm/power.d/journal-commit and change this value there.
    Of course if you have pm-utils installed at all, but I guess it’s some opendesktop depedency.

    Disable ext4 jurnaling

    I decided to use Ext4 with disabled journal.

    # Create ext4 fs on /dev/sda10 diskmkfs.ext4 /dev/sda10


    Enable writeback mode. This mode will typically provide the best ext4 performance.

    tune2fs -o journal_data_writeback /dev/sda10


    Delete has_journal option


    Required fsck

    e2fsck -f /dev/sda10


    Check fs options

    dumpe2fs /dev/sda10 |more


    For more performance add fstab opions: data=writeback,noatime,nodiratime
    i.e:

    /dev/sda10 /opt ext4 defaults,data=writeback,noatime,nodiratime 0 0
    

    This step disables journal

    # Delete has_journal optiontune2fs -O ^has_journal /dev/sda10


    Or when creating:

    mkfs.ext4 -O ^has_journal /dev/sda10


    List of disks:

    etc/fstab
    
    proc            /proc           proc    defaults          0     0
    /dev/mmcblk0p1  /boot           vfat    defaults          0     2
    /dev/mmcblk0p2  /               ext4    defaults,noatime,commit=60  0     1


    tune2fs -o journal_data_writeback /dev/mmcblk0p2
    tune2fs -O ^has_journal /dev/mmcblk0p2


    Required fsck

    e2fsck -f /dev/mmcblk0p2


    Check fs options

    dumpe2fs /dev/mmcblk0p2  | more


    References

    http://crashmag.net/disable-filesystem-check-fsck-at-boot-timehttp://www.ideaheap.com/2013/07/stopping-sd-card-corruption-on-a-raspberry-pi/http://sirlagz.net/2013/03/10/script-automatic-rpi-image-downsizer/http://www.raspberrypi-spy.co.uk/2012/06/resize-sd-card-partitions/http://www.ediy.com.my/index.php/blog/item/61-resizing-sd-card-partitions-for-raspberry-pihttp://superuser.com/questions/826951/disable-logging-on-raspian-debianhttps://bbs.archlinux.org/viewtopic.php?id=113516&p=2http://fenidik.blogspot.com/2010/03/ext4-disable-journal.html